What to do with (Not Provided) in Analytics

Any business keeping a close eye on their Google Analytics account to track their website's data may have noticed a disturbing trend lately. The dreaded (Not Provided) term in the organic keyword report has suddenly become the vast majority of organic traffic, sometimes more than 95%! This means site owners are no longer able to see what keyword searches are driving traffic to their site. Many site owners are asking themselves, "What's going on? How can I get that data back?"
The reason for this shift is Google's new policy of making all searches performed on Google default to "secure search." Secure search hides a user's search terms from outside sources in order to protect the user's privacy. With all of the recent scandal involving the NSA and privacy concerns, Google has decided to withhold this data as a form of privacy protection. Whether or not this actually protects users, and regardless of what Google's intentions are, the switch to secure search can be a big problem for small and medium sized site owners. Secure search has always been responsible for the (Not Provided) keyword terms, but it only applied if the user was logged in to their Google account. Now that all Google searches are being done through secure search, the only organic keyword data showing up in Analytics are searches done on other search engines, like Bing or Yahoo.
While there is no way to completely recover the lost keyword search terms, there are still some steps you can take to regain some of your data.
1. Google Webmaster Tools
One of the easiest places to recover some of your keywords is from Google Webmaster Tools. If you do not already have a Webmaster Tools account, a free account can be set up at www.google.com/webmasters/tools.
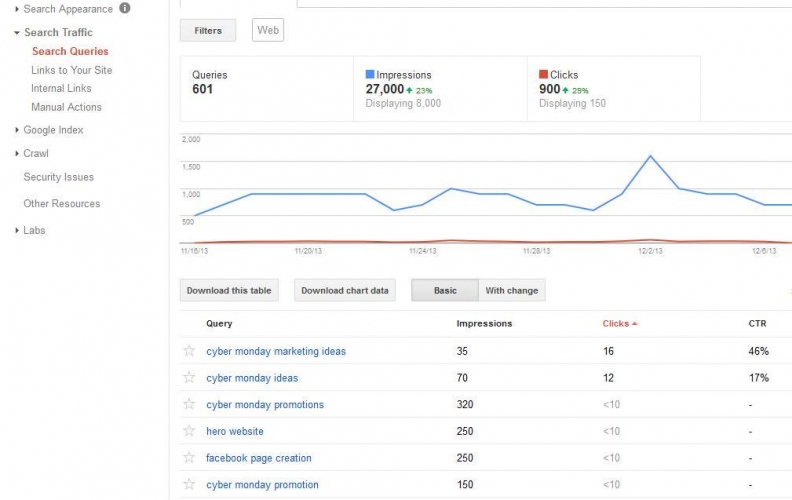
Once you have an account, simply navigate to "Search Queries" under the "Search Traffic" tab. Here you can see up to 2000 of your top performing keywords. While there isn't as much data as Analytics used to provide (there is no bounce rate for instance) you can at least still see what keywords are driving traffic to certain pages on your site as well as long term trends for those keywords. An example is shown below:

2. Set up an Analytics Filter
Filters allow you to modify what data you can view in your Analytics account. You can create a filter that subdivides the (Not Provided) keyword into landing pages for your site. This doesn't allow you to see what keywords drove that traffic, but it will still let you see what pages are performing best, which can help you decide what kinds of searches are most likely driving that traffic.
To set up the Analytics Filter just follow these steps
- Click the Admin tab in the upper right corner of your Analytics Account
- Under the "View" column (The last one on the right) click on "Filters"
- Click "+New Filter"
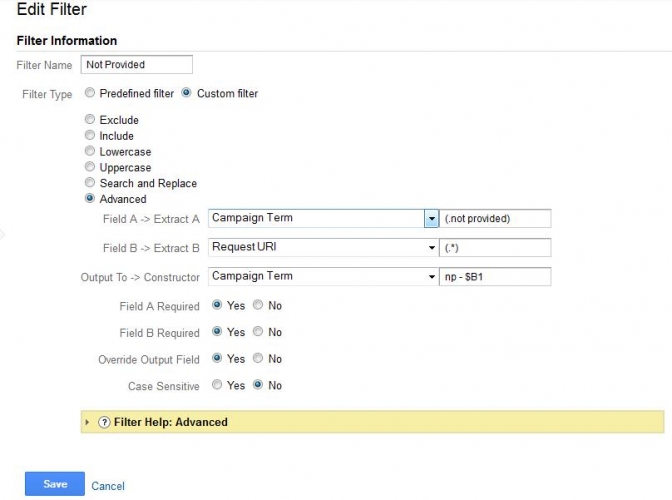
- Edit the fields so they look like this (You can name the filter anything you like)

- Click "Save"
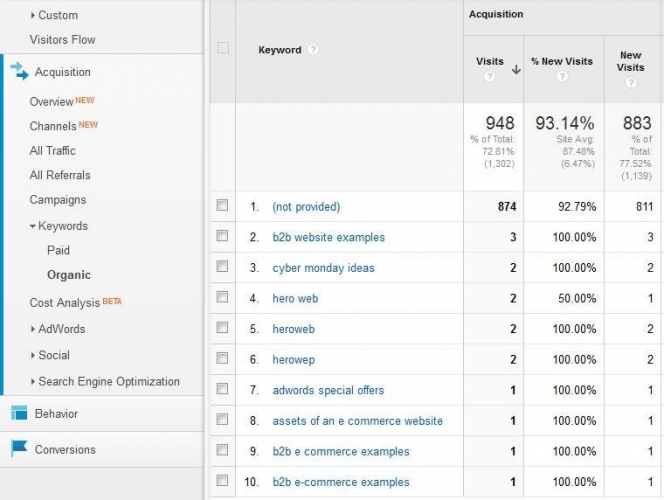
Your old data probably looked something like this

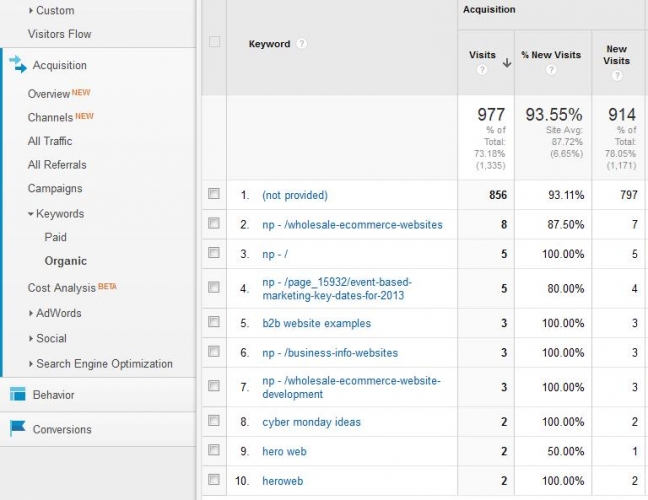
After a few hours, Google will begin collecting (Not Provided) data to look like this

The np - is the (Not Provided) keyword followed by the landing page. This allows you to segment the (Not Provided) keywords, allowing you to see what landing pages are trending and what keywords people may have used to find that page.
3. Enable Site Search
Lastly, make sure you have site search enabled in your analytics account. This feature allows you to track what visitors type into the search bar on your website. If someone lands on your homepage and doesn't see what they were searching for, they may type a very similar keyword set into your site's search bar. Check out Google's instructions on setting up site search in Analytics.
While losing out on your old keyword data may still be a frustrating experience, with a little extra work, you can find many of the keywords driving traffic to your site to help you make the right decisions about what products and services to highlight and where to focus your optimization efforts.

